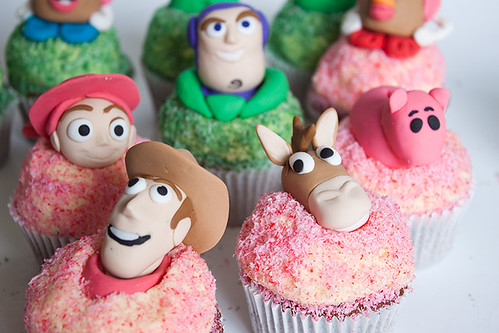
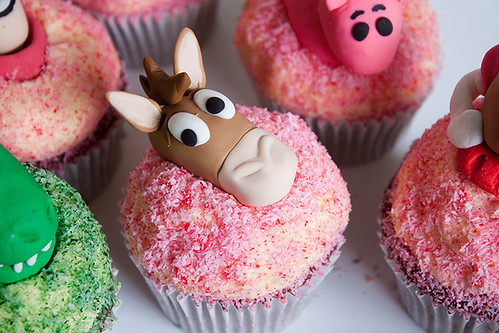
Just before the year ends, I thought I share this toy story cupcakes that I made for order for my friend, Adina. If you have been following me from last year, you may remember that I made the birthday cake for her son, Lachlan's 1st birthday cake. They had small birthday celebration in his prep before they went back to Indonesia for holiday. Last year, Lachlan was a big fan of winnie the pooh but this year, he's into Toy story especially Buzz Lightyear. As there are quite many characters in Toy story, it's perfect to make different kind of character for each cupcake.
The base flavour of the cupcake is Milo Cupcake with Vanilla Frosting and desiccated coconut. They are one of my favourite base flavour for the cupcake. Who doesn't love Milo cupcake? Even I'm as an adult still love Milo, lot and lots of Milo. Okay, enough said.. Let me share some recipes for Milo Cupcake. Last but not least, Happy 2nd Birthday Lachlan and Happy New Year 2012 for all of you..
Milo Cupcake
(Makes 12 Cupcakes)

Ingredients
100g Plain Flour
20g Cocoa Powder
100g Milo
140g Caster Sugar
1 1/2 teaspoon Baking Powder
Pinch of Salt
40g Unsalted Butter, at room temperature
120ml Whole Milk
1 Egg
1/4 teaspoon Vanilla Extract
Method
1. Preheat Oven to 170ºC. Put the flour, cocoa powder, sugar, milo, baking powder, salt and butter in a mixer with paddle attachment. Beat on slow speed until you get a sandy consistency and everything is combined.
2. Whisk the milk, egg and vanilla extract together then slowly pour about half into the flour mixture, beat to combine and turn the mixer up to high speed to get rid of any lumps.
3. Turn the mixer down to a slower speed and slowly pour in the remaining milk mixture. Continue mixing for a couple more minutes until the mixture is smooth. Do not overmix.
4. Spoon the mixture into the paper cases until two-thirds full and bake in the preheated oven for 20-25 minutes, or until skewer inserted in the centre should come out clean. Leave the cupcakes to cool slightly in the tray before turning out onto a wire cooling rack to cool completely.
Vanilla Frosting
Ingredients
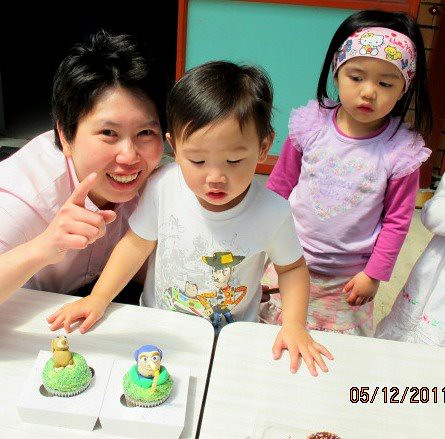
Happy 2nd Birthday, Lachlan!
Ingredients
250g Icing Sugar, sifted
80 g Unsalted Butter, at room temperature
25ml Whole milk
Few drops of Vanilla Extract
Desiccated Coconut
Green and Pink Food Colouring
Method
1. Beat the icing sugar and butter together in electric mixer on medium-slow speed until mixture comes together and is well mixed.
2. Turn the mixer down to slow speed. Combine the milk and vanilla extract in a separate bowl, then add to the butter mixture a couple of tablespoon at a time.
3. Once the the milk has been incorporated, turn the mixer up to high speed. Continue beating until the frosting is light and fluffy, at least 5 minutes. The longer the frosting is beaten, the fluffier and lighter it becomes.
Assembling the Toy Story Cupcake
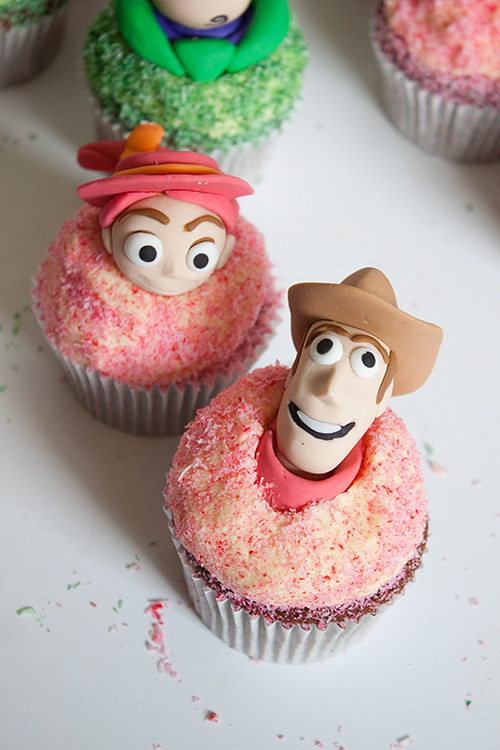
1. Divide the desiccated coconut into 2 bowls, dyed coconut into green colouring on 1st bowl and pink colouring on 2nd bowl.
1. Divide the desiccated coconut into 2 bowls, dyed coconut into green colouring on 1st bowl and pink colouring on 2nd bowl.
2.Using an ice cream scoop full of frosting to get the right shaped and then dipped in coconut. Press the coconut on and tidy up the shape.
3. Place each toy story characters on top of the cupcake.
Happy 2nd Birthday, Lachlan!