Sunday, July 31, 2011

Elmo Cake and Elmo Cupcake

Elmo Cake

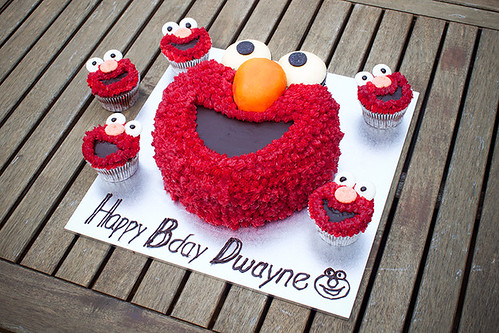
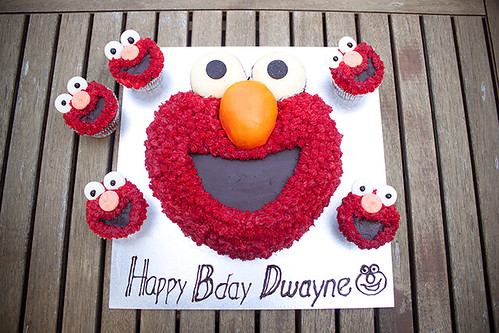
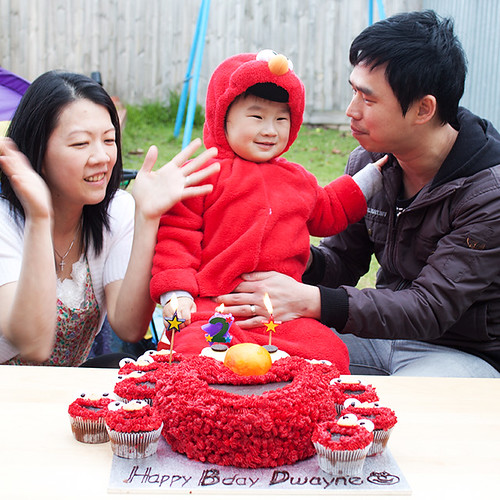
Elmo Cake! Elmo Cupcake!
I am very excited to write this post and can't wait to share with you all.  Since Winnie The Pooh's cake  I made last year, I thought that I gave myself another challenge. I asked my best friend whether she would like me to make a birthday cake for her son. She asked me whether I can make Elmo Cake? I thought I can give them a try!. I did lots of research on this. I also received lots of tips and advised from my other besties who made this Elmo cake before on her son's 1st birthday. It was an exciting process after all.

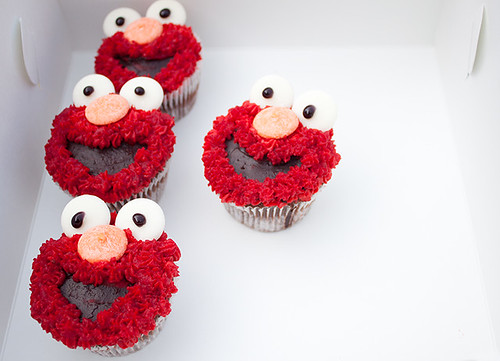
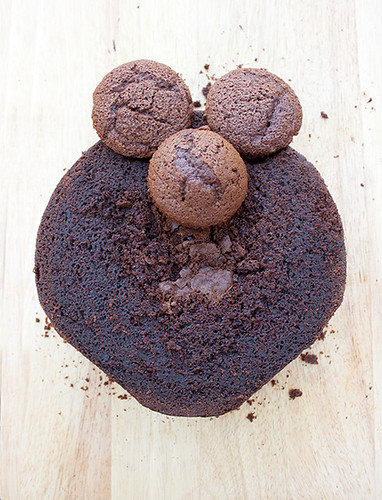
I baked Dark Chocolate Mudcake for the base cake of the elmo and used 3 milo muffins for eyes and the nose of the Elmo. I didn't want to waste the rest of milo batter, so I made the Elmo Cupcake and they were a big hit at the party! The smile and the excitement of the children eating Elmo Cake and Elmo Cupcake were absolutely priceless and that was exactly what I was looking for. Happy Children!

The whole process of making this cake took about 3   separate days of preparation. I do think that you could do all this work in one day. Although It would take very long hours. On the first day, I baked the mud cake and the muffins. On the second day, I prepared the buttercream as my friend advised me to achieve the very red colour of elmo, it was best to do the night before. On the third day, I did the ganache (used the same ganache recipe from Winnie the pooh cake) and piping the cake.

Thank you to my hubby for helping me ganaching the cake and shaping the face of the Elmo. It was a success party at the end. Last but not least, Happy Birthday, Dwayne!

Elmo Cake


Elmo Cake and Elmo Cupcake

Elmo Cake

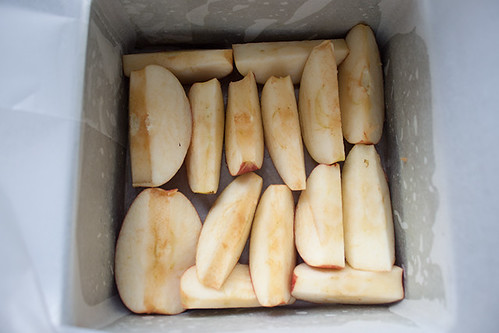
Dark Chocolate Mud Cake
(For 22 cm or 9 inch round Cake)

Ingredients
220g Butter
220g Dark Chocolate, chopped
25g Coffee Granules
125g Self Raising Flour
125g Plain Flour
50g Unsweetened Cocoa Powder
1/2 teaspoon Bicarbonate of Soda
480g Caster Sugar
4 Eggs, lightly beaten
7 teaspoon Vegetable Oil
100ml Buttermilk

Method
1. Preheat the oven to 160ºC. Grease the tin and line the base and sides with baking paper that extends 2cm above the top of the tin.

2. Put the butter, chocolate and coffee in a saucepan with 160ml water and stir over low heat until melted, then remove from the heat.

3. Stir the flours, cocoa, and bicarbonate of soda into a large bowl. Stir in the sugar and make well in the centre. Add the combined egg, oil and buttermilk and the chocolate mixture, stirring with a large spoon until completely combined.

4. Pour the mixture into the tin and bake for 1 hour 30 minutes or until skewer poked into the centre of the cake comes out clean. Leave the cake in the tin until cold.


Elmo Cupcake
(From Milo Cupcake recipe)

Elmo Cake

Ingredients
100g Plain Flour
20g Cocoa Powder
100g Milo
140g Caster Sugar
1 1/2 teaspoon Baking Powder
Pinch of Salt
40g Unsalted Butter, at room temperature
120ml Whole Milk
1 Egg
1/4 teaspoon Vanilla Extract

Method
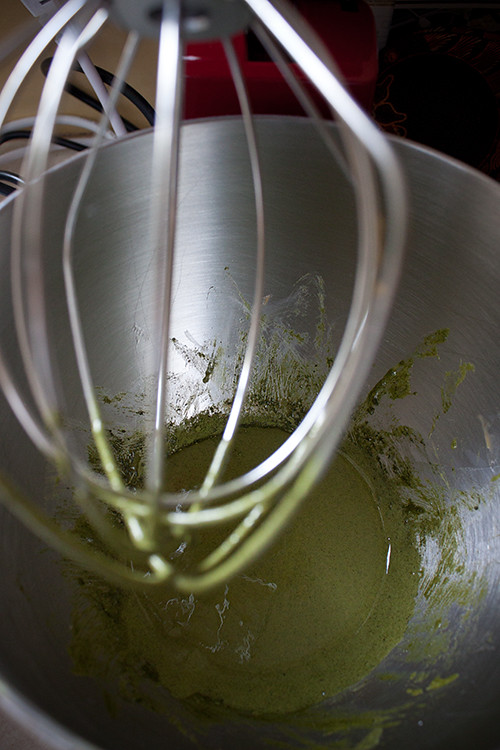
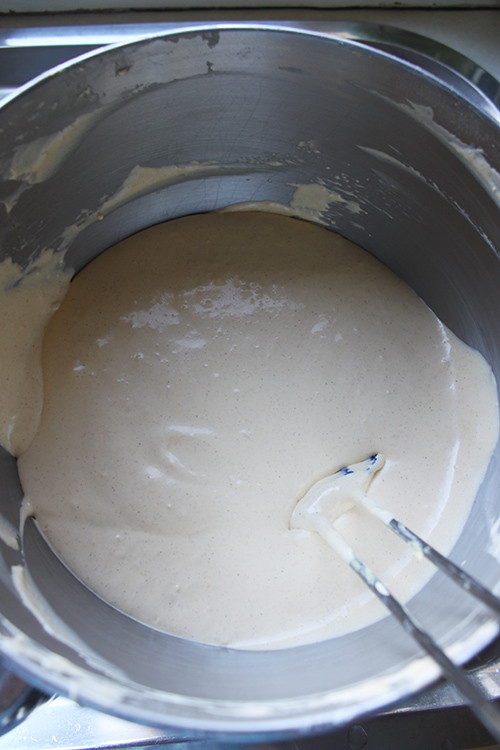
1. Preheat Oven to 170ºC. Put the flour, cocoa powder, sugar, milo, baking powder, salt and butter in a mixer with paddle attachment. Beat on slow speed until you get a sandy consistency and everything is combined.

2. Whisk the milk, egg and vanilla extract together then slowly pour about half into the flour mixture, beat to combine and turn the mixer up to high speed to get rid of any lumps.

3. Turn the mixer down to a slower speed and slowly pour in the remaining milk mixture. Continue mixing for a couple more minutes until the mixture is smooth. Do not overmix.

4. Spoon the mixture into the paper cases until two-thirds full and bake in the preheated oven for 20-25 minutes, or until skewer inserted in the centre should come out clean. Leave the cupcakes to cool slightly in the tray before turning out onto a wire cooling rack to cool completely.

5. When the cupcakes are cold, spread with chocolate ganache and decorate with butter cream. (I used Orange and White Wilton Candy Melts for the eyes and nose for the elmo cupcakes)

Buttercream Frosting

Ingredients
500g Icing Sugar
160g Unsalted Butter, at room temperature
50ml Whole Milk
a Couple of Drops of Vanilla Extract
Food Colouring

Method
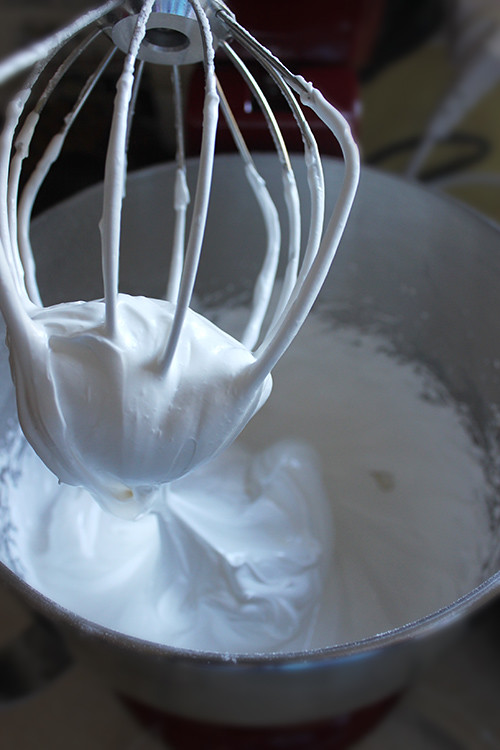
1  Beat the icing sugar and butter together in a freestanding electric mixer with a paddle attachment on medium slow speed until mixture comes together and is well mixed. Turn the mixer down to slow speed.

2. Combine the milk and vanilla extract in a separate bowl, then add to the butter mixture a couple of tablespoon at a time. Once the milk has been incorporated, add the food colouring and turn the mixer up to high speed. Continue beating until the frosting is light and fluffy at least 5 minutes. The longer the frosting is beaten, the fluffier and lighter it becomes.

How to assemble
1. Once you have the cake and muffin ready, have the Elmo Template ready and start to cut the round cake and shaped an  Elmo's face. (I wish I had the Elmo tin, so I can skip this part and begins to ganache and pipe the cake). Placed 2 muffins with ganache on the bottom of muffin for the eyes of the Elmo and 1 muffin for the nose of Elmo.

Elmo Cake

2. Start ganache the cake and the cupcake. Once the ganache is set hard, spread the buttercream over the nose and the eyes of elmo cake and start the piping process.

Elmo Cake


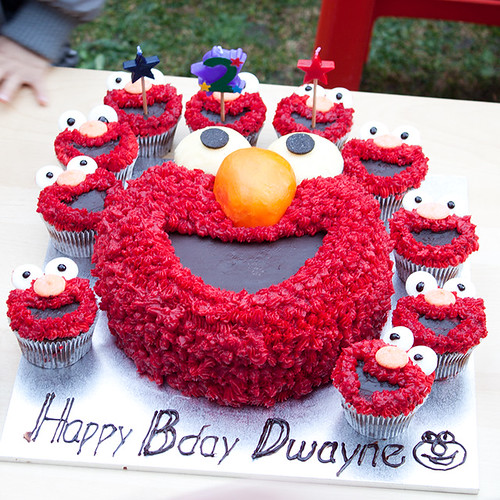
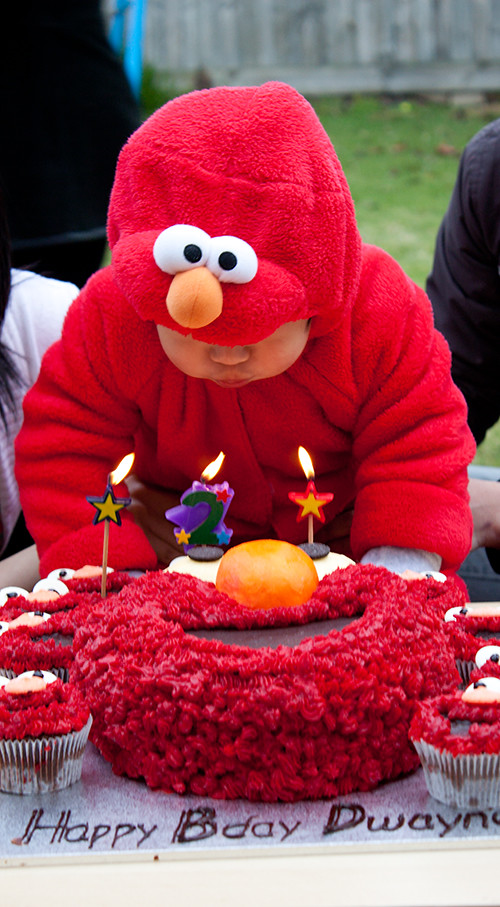
Happy 2nd Birthday, Dwayne!

Elmo Cake

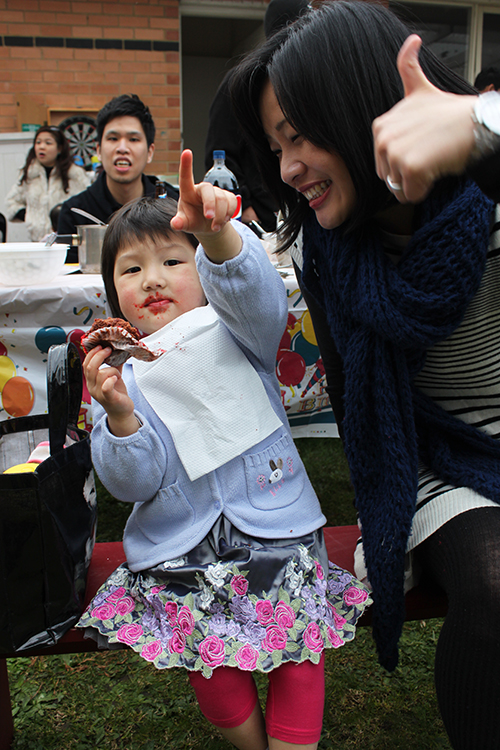
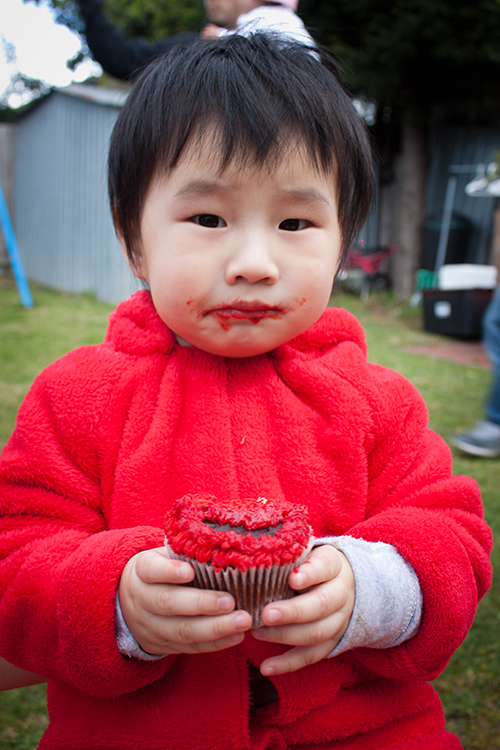
This is what I was aiming for! The red mustard on Dwayne's face while eating Elmo Cupcake

Elmo Cake

And I've also got some more fans at the party eating my Elmo Cake and Elmo Cupcake. Grace was one of them!

Elmo Cake

Saturday, July 23, 2011

Irresistible Lemon Loaf

Lemon Loaf


Our Lemon Tree grow enormously in this cold winter season. As usual, we give away to our friends, neighbours and work colleagues. They are still plenty spare for us as well and I am already getting sick of drinking honey and lemon everyday, so I made lemon loaf. It was simply delicious. The balance between the zingy lemon flavour and the sweetness of the glaze are perfect!

Sometimes things in life comes from simple things and this lemon loaf is one of them, they just made my day...

Lemon Loaf

Lemon Loaf

Ingredients
95g Plain Flour
95g Self Raising Flour
1 teaspoon Baking Powder
1/4 teaspoon Bi-Carb Soda
1 teaspoon Salt
225g Caster Sugar
4 Eggs, at room temperature
1/4 Cup Grated Lemon Zest
1/4 Cup Fresh Lemon Juice
225g Unsalted Butter, Melted and Cooled
1/4 Cup Sour Cream
1 teaspoon Vanilla Extract

Method
1. Preheat Oven to 180º C. Spray the sides and the bottom of the loaf pans. Line the side and bottom with baking paper.

2. Sift both flours, baking powder, baking soda and salt together in a medium bowl.

3. Put the Sugar, eggs, lemon zest and lemon juice in a food processor and pulse until combined. With the motor running, drizzle the butter in through the feed cube. Add the sour cream and vanilla and pulse until combined. Transfer the mixture to a large bowl.

4. Sprinkle in the flour mixture. one third at a time folding gently after each addition until just combined. Do not overmix.

5. Pour the butter into the loaf pan. Bake for 20 minutes, reduce the oven temperature to 165ºC and bake for another 30 minutes or until skewer inserted in the centre of the loaf comes out clean. Let cool in the pan for 15 minutes.

flamingpot_lemon_loaf_7800_LR

6. Brush the side and the tops with lemon syrup. Once the cake is completely cool, add the glaze.

Lemon Loaf

Lemon Syrup

Ingredients
1/3 cup Lemon Juice
75g Caster Sugar

Method
In a small saucepan, over a medium heat, heat the lemon juice and sugar until the sugar is completely dissolved. Once dissolved, continue to cook for 3 more minutes. Remove from the heat and set aside.

Lemon Glaze

Ingredients
125g Icing Sugar
2-4 tablespoon Fresh Lemon Juice

Method
Whisk together icing sugar and 2 tablespoon lemon juice. The mixture should be thick but pourable. If the mixture is too thick, add another 2 tablespoon of lemon juice and whisk again until you get the right consistency. Pour the lemon glaze over the top of the loaf and let it drip down the sides. Let the lemon juice gets harden, about 15 minutes before serving.

Lemon Loaf

Thursday, July 21, 2011

Matcha Cookies and Cream Ice cream

Matcha Cookies and Cream

I may be crazy to crave ice cream in the middle of cold winter season.  I've been dreaming to try to make this Matcha/ Green Tea ice cream since I got back from Japan until one day I read the tweets from Kyoto Foodie on Twitter about Haaggen-Dasz Matcha Cookies and Cream Ice Cream, Oooh.. How incredible! Then that's it.. my mind just can't stop thinking about it. I have an ice cream maker which I rarely use it during this crazy unbelievably melbourne cold weather and I can't wait until summer time to make this.. When you crave, you crave.. Just gotta find a way to fulfil those needs..

I added some mini oreo onto the mixture but it was hardly to see on the picture and I should have wait until the ice cream was really set when taking the picture. Oh well..  this ice cream was satisfying enough for my craving moment and I never can't get enough of this.. 

Matcha Cookies and Cream Ice Cream

Matcha Cookies and Cream

Ingredients
200g Full Cream Milk
3 Egg Yolks
80g Caster Sugar
10g Green Tea Powder
100g Heavy Double Cream
Mini Oreos Cookies

Method
1. Heat Milk in a saucepan until almost at the boiling point, then remove from the heat and set aside.

2. In a mixing bowl, beat egg yolk and sugar until pale yellow in colour. Add Green Tea Powder and mix well.

Matcha Cookies and Cream

3. Add warm milk and mix well. Return mixture to the same saucepan and heat very gently, stirring constantly, until thicken to form a custard.

4. Transfer custard into mixing bowl. Place bowl in a larger bowl half- filled with iced water to cool. 

5. In a chilled bowl, whipped the cream until stiff peaks form. Add whipped cream to custard and fold through. Transfer the mixture to an ice cream maker and churn according to the manufacturer's instructions. (Add the mini oreo while the motor running).

6. Store in the freezer or serve immediately. I serve mine with sprinkle Caramel Crunch. 

Sunday, July 17, 2011

Indonesian Layer Cake (Kue Lapis Legit)

Indonesian Layered Cake - Kue Lapis Legit

I admire this cake to bits since I was growing up. When I was living back home in Indonesia, I remember asking my mum about the unique of this cake that make the baker charge them quite expensive. She said the time consuming of making this beautiful layer cake is one of the factor. Well, I can now totally understand the reason behind them, I spent 4 hours to make this cake but I can tell you that is all worth it! Love the spice aroma that comes from this cake, they just bring back to my childhood memories..

However, my mum mentioned on my last trip to Indonesia early this year that they are now making this cake in pandan flavour! oohh Imagine that.. If you have been following me from the beginning, you may aware that I have big addiction to Pandan leaf. My mum made an attempt to buy the layer cake in Pandan flavour for me on my last visit but apparently they are selling really fast and we had to order far in advance. I guess this would add to my things to do list on my next visit to my hometown.

So, here they are, I present you the original flavour of Layer Cake (Kue Lapis Legit).

Indonesian Layer Cake (Kue Lapis Legit)

Indonesian Layered Cake - Kue Lapis Legit

Ingredients
6 Egg Whites
15 Egg Yolks
250g Icing Sugar, sifted
390g Dutch Butter
120g Plain Flour
1/2 teaspoon Baking Powder
2 teaspoon Five Spice Powder (Bumbu Spekoek)
3 tablespoon Condensed Milk


Method
1. Preheat oven to 180º and grease 20-22 cm square cake tin.


2. Whisk Egg Whites to soft peak. Gradually Add Icing Sugar till stiff peaks form. 

Indonesian Layered Cake - Kue Lapis Legit

3. Add Egg yolks one at a time, beating well between each yolk. Add butter and condensed milk,  beat till well incorporated.


4. Sift the flour, baking powder and five spice powder together. Fold the flour mixture into batches.

Indonesian Layered Cake - Kue Lapis Legit

5. Put about a third of a cup of the cake mixture onto the base of the cake tin and spread it evenly over the base. Place in oven and bake for about 5-7 minutes until golden brown.


6. Turn the oven to grill function. Add another third cup of the cake mixture for the second layer. Repeat the same process and keep going until you have finished all the batter.

Indonesian Layered Cake - Kue Lapis Legit

Thursday, July 7, 2011

Caramel and Apple upside-down Cake

Upside Down Cake

It's winter time! We all need comfort food during this season.. I know I do! I have some admiration with upside down cake, they just look impressive and it's actually quite easy to make until at last minute, I realised that I wasn't suppose to use the spring form pan to bake the upside down cake as the caramel syrup may leak out from the base during cooking. So I changed immediately to the available pan I have that was not spring form  (I guess this was the sign that I need to update my kitchen equipment). The square pan happened to be my lucky charm, even though the size is quite small but still works for the cake. Just as I thought this was supposed to be an easy simple baking on one Sunday afternoon.

After all the hustle, I love the result of Caramel and Apple upside- down cake. I know my husband loves it, he already requested for me to bake this again next weekend.


Caramel and Apple upside-down Cake

Upside Down Cake

Ingredients
5 Royal Gala Apples, cored and cut into wedges
495g Caster Sugar
300 Unsalted Butter, softened
1 1/2 teaspoons Vanilla Extract
300g Plain Flour
1 tablespoon Baking Powder
75g Almond Meal
1 teaspoon ground cardamon
7 eggs, at room temperature
80ml Milk

Method
1. Preheat oven to 170°. Grease and line the base of a cake pan. Starting from the edge of the pan, tigthly pack apple skin side down in a pan, then pack remaining wedges into the centre.

Upside Down Cake

2. Place 220g Sugar and 180 ml water in a small saucepan and stir over medium heat until sugar dissolves. Bring to the boil then simmer to a dark caramel. Pour into the pan, pouring around the edge first, then the centre. Working quickly, arrange apple over caramel.

3. Using an electric mixer, beat butter, vanilla and remaining 275g sugar until pale and fluffy. Add flour, baking powder, almond meal, cardamon into butter mixture. Add eggs and milk and beat on low speed until smooth.

4. Spoon batter over apple and level the back of the spoon. Bake on the bottom shelf of the oven for 30 minutes, then cover with baking paper to prevent over browning and bake for a further 45 minutes or until cake comes away from the sides of the pan or a skewer inserted into the centre comes out clean. Cool into the pan for further 15 minutes, then run a knife around the cake and turn out onto a plate.

5. Serve the cake warm at a room temperature.

Upside Down Cake

LinkWithin

Related Posts Plugin for WordPress, Blogger...