Monday, September 26, 2011

Spring Themed Cake (1 Year Blog Anniversary and Product Review)

Spring Theme Cake

This week I marked one year since I started this blog. How fast the time flies! Looking back a year ago,  I remember I kept staring to the blank white screen, thinking about the words I would share with the world. Oh memories... This blog has been a big part of my life ever since... Thank You to my lovely reader who have been supported for the past year. 

Spring Theme Cake

Spring Theme Cake

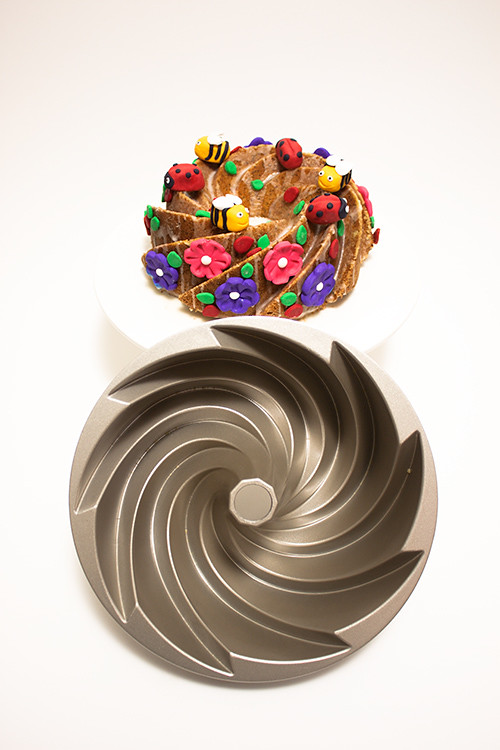
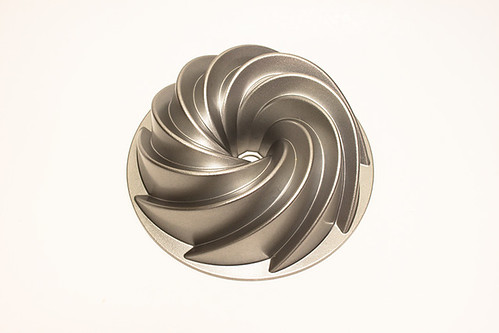
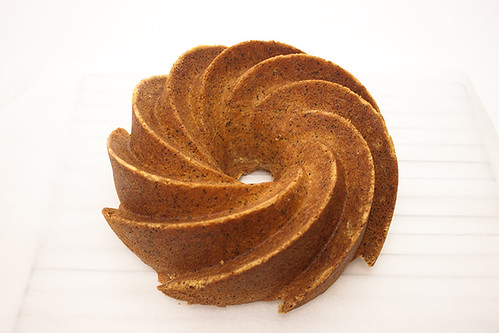
For celebrating my one year blog, Kitchenware Direct generously gave me Nordic Ware Heritage Bundt Pan to product test. I own few bundt cake pan before but I must say that is nothing like this nordic ware product, not only they create one impressive looking cake, they are also made from thick cast iron which will last long and keep the cake moist and give a nice crust on the outside. I was actually worried at first that the cake would stick into the pan (like my other bundt pan) when I turned them on the wire rack, in fact the cake was easily slid out of the pan, they are just simply gorgeous with deep ridges and swirling design. This explains a lot that the nordic ware products are selling very well in kitchenware direct with their high quality reputation.


Spring Theme Cake

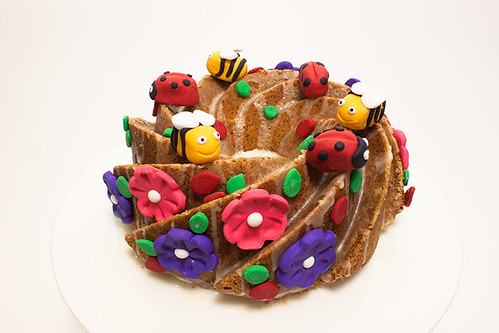
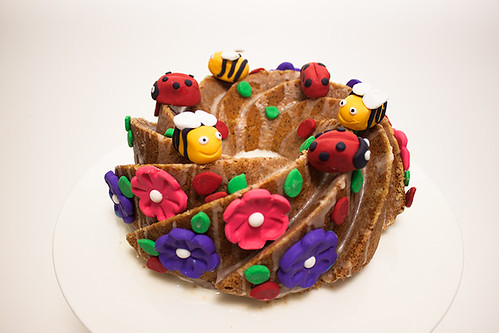
I decided to bake the orange and poppy seed cake for my first nordic ware bundt pan. The cake alone without the glaze and the spring decoration have already giving the "WOW" factor and beautiful presentation on the dining table. Since this week is my blog birthday and it's a spring time here in Australia, so I thought that I add a spring theme with lots of colour to the cake. The result of this cake when they came out from the oven are amazing! I felt like I was a little girl on the christmas morning when I unmold the cake from the pan and feeling stunned on how the cake was turned out! My next cake project for this pan is butterscotch cake or coffee cake or gingerbread cake? Ooh.. Many to choose from.. For sure, I definitely going to use this pan for many cakes to come.

Orange and Poppy Seed Cake with Lemon Glaze

Spring Theme Cake

Ingredients
200g Unsalted Butter, plus extra for greasing
225g Self Raising Flour, plus extra for dusting
200g Caster Sugar
4 Large Eggs
2 tablespoon Milk
Grated zest of 2 Oranges
2 tablespoon Poppy Seeds

Method
1. Preheat the oven to 160º. Grease and flour the base and sides of the pan. Ensure all the ingredients are at room temperature. Put all the ingredients into a large bowl and beat with whisk for 8-10 minutes. Pour the mixture into the prepared tin.

2. Bake for 25-35 minutes until the cake has shrunk away from the sides of the tin and is springy to the touch. Leave to cool in the pan for a few minutes before turning out onto a wire rack to cool completely.

Spring Theme Cake

3. Cover with lemon glaze icing and decorate (if you wish) or you can serve with the icing alone.

Spring Theme Cake


Lemon Glaze Icing

Ingredients
Juice of 2 Lemons
500g Icing Sugar, sifted

Method
1. Pour the Lemon Juice into a medium bowl and add the icing sugar a spoonful at a time, stirring well to remove any lumps.

2. Gently stir the sugar and juice together until you achieve a white icing that is glossy and not dry or stiff. Pour the glaze over the cakes. 

Spring Theme Cake

Thursday, September 22, 2011

Car Cake

Cars McQueen Cake

Happy Thursday Everyone! I thought I share a quick post in the middle of preparing something special and sweets for celebrating 1 year old of my blog. How fast the time flies!

Cars McQueen Cake

This car cake is one of the cake orders that I made for colleague's grandson. The base flavour of this cake is a mud cake using the same recipe as the Elmo Cake. For the letters, I used the Sugar Cookie recipe from Hawthorn Footy Cake and using the fondant to shape the car.

Cars McQueen Cake

Stay tune everyone for the next sweet birthday post! I can't wait to share them with you in couple more days! xoxo

Cars McQueen Cake

Thursday, September 15, 2011

Cookie Monster Cupcakes

Cookie Monster Cupcake

Another week, another order.. Yayy for me.. This time is the cookie monster cupcake. Who doesn't love Cookie Monster when we were a kid? They are such a cute character, aren't they? The base for this cupcake is Mocha flavour with coffee cream filling and vanilla frosting.

Cookie Monster Cupcake

I made each cupcake different to add bit character to the finish cake. I used the wilton candy melts and black colouring gel for the eye. Making this Cookie Monster Cupcake was so much fun.

Cookie Monster Cupcake

Please let me know for anyone in Melbourne interested in custom dessert orders, feel free to contact me at flamingpot10@gmail.com


Cookie Monster Cupcakes

Cookie Monster Cupcake


Mocha Cupcake

Ingredients
1 tablespoon instant coffee granules
60ml Hot Water
125g butter, softened
165g caster sugar
2 eggs
1 tablespoon cocoa powder
150g self-raising flour
80g almond meal
125g dark chocolate, melted
180ml buttermilk


Method
1. Preheat oven to 160°C. Line a 12-hole, 1/3-cup (80ml) capacity muffin pan with paper cases.


2. Combine coffee granules and hot water in a cup. Stir until dissolved. 
3. Beat butter and sugar in a medium bowl with an electric mixer until light and fluffy. Add eggs, one at a time, beating until just combined between additions. 

4. Fold in half of the combined sifted cocoa and flour, all the almond meal and then the chocolate. Fold in the buttermilk, remaining flour mixture and the coffee mixture. 

5. Divide mixture among paper cases. Bake for about 20 minutes or until cooked  Cool cakes on a wire rack.


Cookie Monster Cupcake

Coffee Cream (for the filling)


Ingredients
3 teaspoons instant coffee granules
1½ tablespoons hot water
185g unsalted butter, softened
2¼ cups (360g) icing sugar, sifted

Method
Combine coffee granules and hot water in a cup. Stir until dissolved. Beat butter in a medium bowl with an electric mixer until as pale as possible. Gradually beat in half the icing sugar, all the coffee mixture, then the remaining icing sugar. 

Cookie Monster Cupcake

Once the cupcake is cooled, fill a coffee buttercream in pastry bag with small tip. Push a tip through bottom of paper liner to fill each cupcake.

Cookie Monster Cupcake

Assembling Cookie Monster Cupcake

Ingredient
Blue Colouring
Desiccated Coconut
Black Decorating Gel (For the eye), I used the one from wilton
White Candy Melton, from Wilton

Method
1.  Dyed the coconut into blue colouring

2. Using an ice cream scoop full of frosting to get right shape and then dipped in coconut. Press the coconut on and tidy up the shape. Trim the cookie little or make his mouth further up and put the cookie pieces around it.

3. When frosting has firmed a little, cut a slice out near the bottom and push the cookie in

4. Add 2 white candy melt for the eyes for each cupcake and then pipe the black decorating gel in the middle.

5. Decorate each cupcake with different character and have fun with it.

Cookie Monster Cupcake

Sunday, September 4, 2011

Horse Themed Cupcakes

Horse Theme Cupcake

It's good to be back after being away sick for a week. I meant to write this post last week but I was feeling worse than ever. Just a thought that I can catch up on my blog and relax after busy week from  cake and cupcake orders, instead I was stay in bed and sick. Oh well, this is always happen to me every time the season change from winter to spring.

Horse Theme Cupcake

Back to the horse theme cupcake, they are cute, aren't they?  My colleague gave me a few ideas for horse theme cupcake for her daughter's 11th birthday. I love the challenge for every order I received. As usual, I showed my colleague's idea to my hubby and he came up with these lovely varieties of horse theme cupcakes. I am indeed very lucky to have a hubby who always give me an input. So we finally have 6 horse's butt and 6 horse's faces. The comments that I received from my colleague was simply made my day, she mentioned that the result of this horse theme cupcakes is exceed her expectation.

Horse Theme Cupcake

The flavour base of this cupcake is Hazelnut Chocolate Cupcake and vanilla frosting with green leaf colouring for the grass. The fun began when shaping the horse's faces and horse's butts using the fondant.

Horse Theme Cupcake

Thank You again to my lovely colleagues and friends who ordered cakes and cupcakes from me. For anyone in Melbourne interested in custom dessert orders including (but not limited to) cakes, cupcakes, cookies, tarts, please feel free to contact me with your request at flamingpot10@gmail.com

Horse Theme Cupcakes

Horse Theme Cupcake

Hazelnut and Chocolate Cupcakes

Ingredients
100g Plain Flour
20g Cocoa Powder
140g Caster Sugar
1 1/2 teaspoon Baking Powder
a pinch of Salt
40g Butter, at room temperature
120ml Milk
1 Egg
120g Hazelnut Spread (Nutella)

Method
1. Preheat the oven to 170º. Put the flour, cocoa powder, hazelnut spread (nutella), sugar, baking powder, salt and butter in a electric mixer on slow speed until you get a sandy consistency and everything is combined.

2. Slowly pour the milk into the flour mixture, beating well until all the ingredients are well mixed. Add the egg and beat well.

3. Spoon the mixture into the paper case until two-thirds full and bake in the preheated oven for about 20 minutes or until the sponge bounces back when touched. Leave the cupcakes to cool slightly in the ray before turning out onto a wire cooling rack to cool completely.

Vanilla Frostings

Horse Theme Cupcake

Ingredients
250g Icing Sugar, sifted
80 g Unsalted Butter, at room temperature
25ml Whole milk
Few drops of Vanilla Extract
Green Leaf Colouring

Method
1. Beat the icing sugar and butter together in electric mixer on medium-slow speed until mixture comes together and is well mixed.

2. Turn the mixer down to slow speed. Combine the milk and vanilla extract in a separate bowl, then add to the butter mixture a couple of tablespoon at a time.  Add the green leaf colouring.

3. Once the the milk has been incorporated, turn the mixer up to high speed. Continue beating until the frosting is light and fluffy, at least 5 minutes. The longer the frosting is beaten, the fluffier and lighter it becomes.

Once the cupcakes are cool, pipe the frosting with wilton tip #233 and top the green frosting with the horse's faces and horses's butts made by fondant.  Here are the variety for the horse theme cupcakes

Horse Theme Cupcake

Horse Theme Cupcake

Horse Theme Cupcake

Horse Theme Cupcake

LinkWithin

Related Posts Plugin for WordPress, Blogger...